Tuesday, August 30, 2011

Anthropologie Crush


I don’t know about you….but I have a total CRUSH on Anthropologie!! Every time I walk into that store my eyes go wide and drool starts falling out of the sides of my mouth. (not really…but you get the picture!!)

The displays are so artistic and AMAZING! Who would have thought hanging marshmallows from strings would be beautiful?

…or growing moss on the outside of a store would make you feel like you are walking into a forest?


.....or making you feel like you are in Alaska with this Igloo made out of plastic gallon bottles?


How about an art display using pieces of bread?

LOVE. LOVE. LOVE. LOVE.


I especially love the design that was put into each piece of clothing that they make.  Every outfit is very unique. I really embrace being an individual and I think Anthropologie backs up that school of thought.


After walking through the store, looking at everything I can't afford, I usually end up near the home decor area. Once again their decor is so unique. I can't help but look at every knob and pull at least 3 or 4 times. Their dishes are just adorable and can be used for any occasion. The kitchen items are so retro and to die for! The list goes on and on!

So my recent trip to Anthropologie was a home decor success! Lookie what I bought!


Love these precious Ikat bowls. I have already used them for entertaining.


Oh and the drawer pulls....Beautiful! (You will see where these end up very soon!)


How about this adorable ceramic egg crate? I use this on top of my dresser to hold my fun earrings! {Thanks for the idea Jen!}


And...I can't forget the item I splurged on!


You are going to laugh!


My absolutely favorite candle in the entire world! The Muscari Candle! It was $18.00! YIKES! But....well worth every single penny.

Ok…now that I am totally giddy and excited over these Anthropologie finds….I must leave you to enjoy!

Anyone else totally crazy for Anthropologie?
Happy Tuesday!

Amy ©

Monday, August 29, 2011

DIY Weekend Project- Paint Chip Artwork

I am really working on some great projects around the home. I can’t wait to share all of them with you. Unfortunately, I only finished one small project this weekend. Just not enough hours in a day! Can I get an Amen!!??


I decided I needed some new and interesting artwork around the home, but the challenge is that there isn’t much mooh-la in the budget. So…… I went to Pinterest for some great inspiration.

Branches in a garage sale frame—great #diy artwork. Framed Branches

   DIY chevron artwork... Chevron Painted Canvas

 key artwork  -diy Framed Vintage Keys

DIY: Wood Artwork Painted Wood Planks

 diy canvas artwork More Painted Canvas

 DIY paint chip art Framed Paint Chips


These were all great DIY art ideas on a small budget. I decided to try the Paint Chip Artwork. I loved how you can bring so much color into a room for very CHEAP!

paint chip wall art

diy paint chip art

paint chip art

Paint chip art.


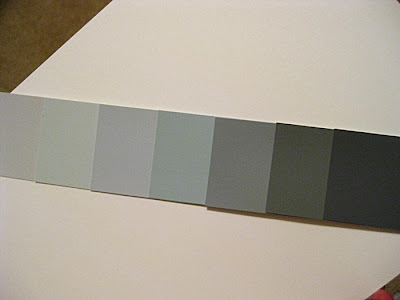
First, I gathered up some Green paint chips at Home Depot for the guest room. They were very large, but I knew I could make them work! Then, I went to Restoration Hardware and picked out some great blue and gray paint chips for my master bedroom.


Next, I started organizing the colors shades from light to dark. I began placing them in a pattern and tried out different ways to arrange the paint chips.


Then, I started taping them together with just plain old scotch tape. Once they were all together, I glued them down to a hard piece of cardstock.


Finally, I put them into frames that I found around the house.


AND.......


PRESTO!.......


(Sorry about the reflections!)


This project cost me $0! I sure did pretty well on my budget…didn’t I? The Hubs will be so pumped!
Can’t wait to hear about the projects you are all working on! Stay tuned for some great projects coming up this week!

Sunday, August 28, 2011

HomeGoods & Marshalls Finds

I don’t know about you, but I am a HUGE HomeGoods & Marshalls Hunter! I love getting lost in the stores and walking around for hours looking for the best deals. I also enjoy getting inspiration from all of the fabulous items the stores have to offer.


I found these pretty lamps yesterday. They would be just Fab in a rockin girls room.

I also saw these lamps. I liked the masculinity that they could bring to a room.

This woven branch mirror would be great in any room!


I didn’t buy any of the above items. But look at the great finds I did bring home for myself!

I found this office chair & city scape for the Hub's New Downtown Office! Look at that original price on the desk chair. It was marked down just because of a tiny scratch on the arm of the leather chair. SCORE!


I fell in love with these Faux Mercury Glass Lamps! I just had to have these for our Master Bedroom. They are going to be very Chic in the room. (will post pics soon!)

Take a look at this great find! A beautiful cheese/dessert platter.  I am currently using it for some of my succulents. I just love the shape and class it brings in my Master Bedroom!

Wow! This was a great find. I couldn’t take my eyes off of this mirror. Beautiful! It is a cut glass mirror. So pretty…and only $16.99! I knew I could find some place for it!

And….my last find. Just a small ceramic bowl for $2.00! Can’t go wrong….right?

Oh How I love the Hunt.....and of Course....the Find!
What great finds have you found lately?

Amy ©


Tuesday, August 23, 2011

DIY Weekend Projects- Homegoods Tray & Sunburst Mirror

Wow! Where did the weekend go? It is already Tuesday and I haven’t shown you my weekend projects! It was a busy and fast weekend with two cookouts with friends, a 5-year-old birthday party and lots of catching up around the house (cleaning, laundry, cooking, yard work, etc.).

I did have a little time to be creative and rummage up some DIY fun!

My first project was very simple…but I LOVE! I bought this tray at HomeGoods on clearance for $2.00! Yup….two-dahlas! I was pumped!
As you can see… I am not a fan of the world traveler look. It might work for some…..but it’s just not my cup of tea. This tray would look great in a library with lots of old books, high back leather chairs and an old man smoking a pipe! HA! Just not in my chic bedroom!

So off I went with one of my favorite DIY items…Spray Paint! First, I sanded the tray down and used a rag to wipe all the excess dust. Then I went to town spraying it with High Gloss white paint. The first coat surprisingly covered most of the map, but wanted to make sure it didn’t show at all. So, I waited for a few hours and then put a second coat on.


And…..


Drum roll Please……


What do you think? I Kind of Like LOVE IT! Chic I say!….and Easy too!

This whole project cost me around $4.50. That included the tray, white paint and sand-paper. Awesome!


SECOND WEEKEND PROJECT

I have to admit that this next project was NOT my own idea. I have been interested in this on-going trend of sunburst mirrors. They have been around now for a while and if you know anything about me… I don’t typically jump on the bandwagon as soon as something comes out. If it doesn’t fit in my home or my style, I just don’t go for it.

However, once I saw this sunburst, I knew I could make one of my own and use it in my home somewhere! This mirror was made by one of my favorite bloggers Hi Sugarplum!
I liked how it brought the natural element of wood into a room. So I started reading Cassie’s instructions and knew this was a project for me! The supplies were simple, 2 floral rings from a craft store, one round mirror  and 2 packs of wood shims from Home Depot. (Cassie used the same size shims, I used two different lengths) Then a pile of glue sticks!
Here is a picture of the back after I glued all the shims to the floral rings:

As you can see, I didn't use quite as many layers as Cassie did. I didn't want mine to take up the whole wall in the guest bedroom. I used one layer of long shims, the second layer consisted of the large shims minus 2 inches. I broke them down so they would be a little shorter then the long shims, but a little longer the the short shims. The last layer was made up of the short shims. I wanted to alternate these different lengths to give it some depth.

Next, I took the 7 inch mirror from Michaels and used Gorilla Glue Epoxy on the back and attached it to the front of the wood shims. I then had to wait patiently for 24 hours until it dried! Believe me...that was a long 24 hours.

Then Wha-La......!


Isn't she a beauty?! {Minus the boob fixture you can see in the reflection}


I really like how it looks in this room. The guest room is finally coming together!
A special Thank-You to Cassie from Hi Sugarplum on her awesome sunburst tutorial! I couldn't have done it without you.

What did you all accomplish this past weekend?

Linked up at: Carolyn's Homework Blog

Related Posts Plugin for WordPress, Blogger...

Total Pageviews