Wednesday, May 21, 2014

Abstract Artwork for Less {Sources}

Some of you may remember this design board I did for a reader's redesign back in March:


I received a lot of great feedback as well as reader's wanting to know the source for the abstract art above the couch. I love how art can pull all the colors of a room together to make it feel cohesive. Sometimes I find a piece of art that inspires a whole room design.
The artwork above the couch is an abstract piece from John-Richard for Horchow. The piece is called "The Camaraderie". The list price is $1250 and is currently on sale for $875.


Now most of us are not in the market for buying such expensive pieces of art, but would like similar abstracts that can bring in color and impact into our homes.


Here are a few sites that have similar pieces for a lot less!


Clare Elsaesser for Etsy


World Market Abstract one & Abstract two


Sisso for Etsy


Minted Abstract Prints


Pamelam for Etsy


Aren't they all fabulous? This is only a small glimpse of some of my favorite Abstract artists for less. I am sure you could find many more on Etsy or even search for some on pinterest.


So tell me...are you an abstract art lover or more of a portrait art lover?


Friday, May 16, 2014

Fabulous Feature Friday {Amy Butler Design}

It's Friday my sweet friends! Time for the weekend and what a better way to get this party started than to share Amy Butler's gorgeous home with all of you today. 

I fell in love with Amy Butler years ago when my mother in law introduced me to her sewing patterns and fabric. She designs patterns for the everyday sewer as well as gorgeous fabric with bright bold patterns and colors. I have made many of her patterns in the past few years. Little did I know that she also has an amazing eye for design and making her house a home. I am so excited to share Amy's house tour today!

Her home is what you call a mid-century style. She has kept that feel throughout her home but has added the edge of mixing vintage finds with mid-century furniture. You will also see this popular Ikea light sprayed gold in her living room. So she has quite the mix of new and old as well as a few of her own fabric pieces throughout the house. I hope you enjoy this fabulous home tour!


"Beauty is in the way you live. Enjoy your surroundings. Let them inspire you. Follow your own path, and approach everything you do with love in your heart." ~ Amy Butler


Doesn't her home just seem so restful? I love the airy feel of the home and the mix of textures she adds to each space. She is also quite the gardener and you can see a full tour of her garden HERE. For more pictures of her home click HERE and more pics of her studio click HERE.

Have any of you ever tackled one of her patterns or used her fabric in your own home?

Have a fabulous weekend my friends! xoxo

Thursday, May 15, 2014

India Hicks Bedding {Guest room Revamp}

If I had all the money in the world, I would switch my bedding every season in every room of my home. I absolutely love adding some warm textures for winter, taking off that heavy duvet and adding a light quilt for summer and bringing in different color combinations all year.


I was so excited when this package arrived at my doorstep a couple of weeks ago:


HSN was so thoughtful to send me a quilt set which happens to be apart of India Hick's new Island Living line. They must have read my mind because I was thinking of revamping the guest room with some lighter bedding for spring and summer.

Previously the guest room looked a little something like this:


The quilt, euro shams and duvet are all from Pottery barn a couple of years ago. I made the green and white pillows from cloth napkins..tutorial here. The bird pillow was a HomeGoods find. I was so in love with green back then. I still like the bedding, but was in need of a change. After seeing how the walls photograph, I think it is also time for a new wall color (not builder beige) and some window treatments. But we are taking baby steps people!

After adding my new India Hicks bedding I realized how much it brightened up the space and added a little more vintage feel to my great grandmother's bed. There is definitely more of a feminine touch to this room, which is good because this room also doubles as my office space which I will be sharing soon.


I had a little fun adding some unexpected colors with the plum and cream bedding. I love the touch of mint in the pillows I recently found at HomeGoods. I added a few others that I had around the house as well as the striped throw from Ikea. Such a fun mixture of colors and patterns. 


This Quilt set is lightweight which is perfect for the warmer months down here in NC! It is made really well and is soft to the touch. The quilt is also reversible with stripes on the opposite side. It also comes in two colorways that you can view here

What do you all think? Be honest..which guest room bedding do you prefer....green or plum?


A HUGE thank you to HSN for sending me this gorgeous bedding. You can check out India Hicks full Island living line Here. You won't be disappointed!! 

*I recieved this quilt set as a gift from HSN. I was not compensated in anyway for this post. All opinions are mine and only mine. Thanks for reading!*

Wednesday, May 14, 2014

Reader's Spaces

I just love this little ole blog, especially when I get fun emails from reader's with pretty finished spaces!

You all might remember this Reader's Redesign that I did for a client last Fall:

Well little by little Ashton and her husband are finishing their space. She recently sent me pictures of her daughter's play corner.

Here is the plan that I sent them last fall:

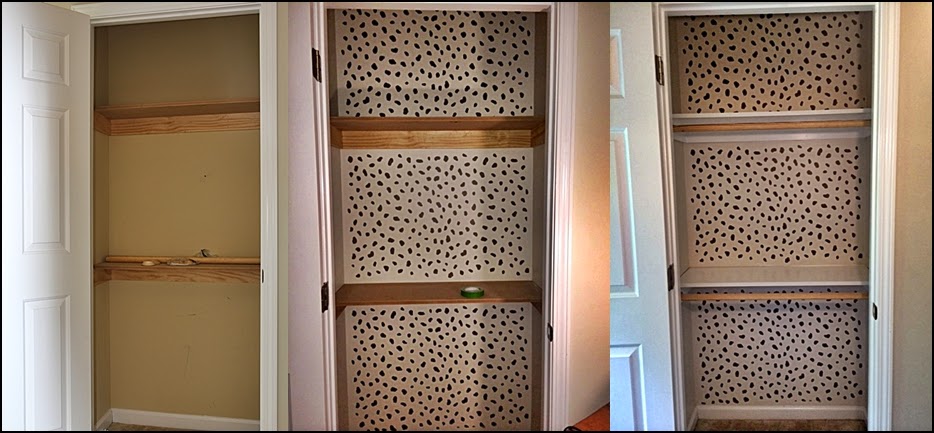
Below is the before and after they sent me:


Doesn't it look great? Ashton is also finishing the curtains that will be hung in this space. I can't wait to see how they transform this little corner. I am sure her sweet little girl loves this art corner. They bought an old Pottery Barn Kids table and chairs from their aunt and refinished the pieces. Here is what they looked like before:


So fun! Thanks Ashton for keeping me posted on your living room/playroom area!
If you want to check out all the before pictures of her space as well as the design plan click HERE.

********************************************************************************

I have met so many amazing people through this blog that every time I connect with someone I just get so excited to chat about design, decorating, diy projects, etc. People probably think I am a little over the top at times! Well, this next reader and I have something else in common. Carly adopted a little girl a couple of years ago and she reached out to me after I posted our Adoption Announcement this past fall. We have even talked on the phone a couple of times. She is an amazing person and I am so thankful she has a heart for adoption. She has sure helped me through some down days.

A couple of weeks ago Carly texted me one evening and wanted some advice on painting stripes. She had seen our Bold Entryway stripes and was inspired to try her hand at it. She sent me these after pictures:


I think they did a fantastic job! Stripes are very tricky if they aren't done correctly. Isn't that turquoise table adorable? I love the pops of color that she has added to her entryway.

A couple of days later Carly sent me the picture below. We talked about how painting the banister and railings would really brighten the space up. What do you think?


There is no question that the stripes and white railings take this builder grade entryway to another level!


Thanks to Ashton & Carly for sharing their updated spaces! I love seeing reader's progress and how they are inspired by this little ole blog.

Have you been working on any projects around your home? Do you need a total Reader's Redesign to get you motivated? Email me your pictures and we can create a space that you love.

Happy Hump Day All!!

Tuesday, May 13, 2014

Tuesday Treats #15 {Inspiration & Ideas from around the web}

Hi All! I hope you all had a wonderful weekend. I was able to spend mother's day at the beach with my niece and nephew. I usually have a hard time with this day knowing that I am just "waiting" to be a mama. But spending the day with my sister-in law and her kids was just what I needed to remind me of how many blessings I truly have in my life. I am a mom in my heart and God has a sweet baby boy or girl in mind for me and hubby. I can't wait to be able to celebrate being a mom next year!

Sorry about no post yesterday. For some reason I can't get on our new wireless while at the beach. I am calling support this morning so I can share some fun posts with all of you this week. The hubs let me borrow his computer for this post!

There has been so many fabulous projects that I have witnessed this past week and I can't wait to share some great ideas and inspiration from around the web today. Hope you enjoy!


1. Backyard Oasis
My friend Kristen never disappoints me and ALWAYS amazes me at the talent she has. She recently revealed her backyard oasis on the Home Depot Blog. Kristen and her husband created this amazing space on their own. Doesn't it make you want to have a backyard party or even better... a date under the stars? For the full reveal and before pictures go HERE. For sources go HERE.


2. A Very Pink Playroom
If you don't follow the blog Dear Lillie, then you are missing out.  Everything Jennifer touches turns to amazing! You have to see the before and after pictures HERE of this darling playroom for her girls.


3. DIY Tassel Drink Stirs
It is almost summer and what better way then to kick the season off with a fun summer soiree. Wouldn't these drink stirs be adorable for your party? They are very simple to make, but create a big impact that guests will be talking about for weeks!
Click here for the full tutorial.


4. DIY Garden Markers
I am sure most of you are getting your gardens ready for spring and summer. I really try every year to create some kid of garden journal or at least use garden markers to help me remember what I have planted. You all know that I am in love with these stoneware garden markers from Arrow & Sage, but if you are trying to save a little money I love these quick and easy ideas too:


5. Five Amazing Uses for Coconut Oil
I don't know about you, but I love anything coconut! I drink mostly coconut milk now or at least a combination of coconut and almond milk. Coconut oil is suppose to be great for your body and I love these five uses below written by Lauren Conrad's editors. I have also used coconut oil as an eye makeup remover. Let me tell you how amazing your eyes feel afterwards!


P.S. Did you enter the Royal Design's giveaway yet? Only Two days left! Go HERE to enter!!

ff2946b67e29d3351b993ac83664d8c6fefd3f068058aacba9

Thursday, May 8, 2014

Royal Design Studio Stencil {Giveaway}

You all know how much I love my new stenciled nursery closet courtesy of Royal Designs. It is truly amazing how far stencils have come over the past few years. I am in love with using stencils as an accent wall, adding a little pop to drapes, pillows or even furniture.

Below are some of my favorites from Royal Designs that I think might just get you all motivated for a fun project!


Project by: Brittany Makes


Project by Living Savvy


Project by: Polka dot chair


Project By: Burlap & Lace


Project by: The Hunted Interior


AND NOW.... THE GIVEAWAY!!

**Royal Designs is giving one lucky reader $50 toward any one stencil of their choice plus FREE shipping (within the continental U.S.)!!**

All you have to do is follow the Rafflecopter below to enter! Giveaway will be open for one week & winner will be announced on Friday 5/16!
Good Luck All!!


a Rafflecopter giveaway

Wednesday, May 7, 2014

Our Nursery Closet Details & {How To}

Well it's Hump Day my friends! I am so so glad. Ready for the weekend already!


Today I wanted to share some details on how we created a functional closet for the nursery as well as show you my stencil techniques (even though I just made them up myself!).

This closet is very small and before we made changes, had only one wire rack at the top:

Some of you smart ones may notice that this isn't the actual closet because I was such a crazy and didn't take any before pics! But...this office closet of ours is the exact size and layout of the nursery closet. So it serves as a perfect before...don't you think!?

So we tore out the wire rack and my brother got to work (while I was at the beach) surprising me by adding the two shelves for the closet.


He Used:
1- 8ft 3/4"x 12" MDF for the shelving 
1- 8ft Closet Rod 
2- 8ft 1x2 clear pine for the support molding
2- sets of wood socket holders
**All cut to size**


I patched the holes, set up my painters tape and started edging the whole closet with the same paint as the room. {Shoji White by Sherwin Williams}


Once that was complete I moved on to the stenciling. As you can see in the picture below, I started at the top and worked my way down. I taped the stencil to the wall and used a foam roller to roll on the darker paint (Anonymous by Sherwin Williams). I would let it dry for 5 minutes, then come back over it once more for a second coat. It is a really large stencil, so I only had to pick it up and move it 6 times. 


Once all the walls were dry, it was time to paint the shelves. We decided to add the sockets before we painted so I could also paint those white then add the poles later. I didn't want to paint the poles because I new the paint would chip from moving of the hangers over them and I liked the natural wood color. 


The sockets were so easy to install. We made sure to measure that they were at the same point on the wood on both sides of the closet then drilled a hole. Thanks to the Hubs for his help of course!


You can see the progression of the closet in the picture below. It was really a pretty simple update and has given us more storage for that sweet tiny room. 


Oh and of course a last before and after. 


I just love this sweet little space! To see more pictures of the actual reveal click HERE.

GREAT NEWS!!! Come back tomorrow for a stencil giveaway of your choice! I am happy to be partnering with Royal Designs to bring you so many choices of stencils!! We all love a fabulous giveaway..don't we?

See you back here tomorrow!
Related Posts Plugin for WordPress, Blogger...

Total Pageviews