
Thursday, September 15, 2011

Striped Walls-Boys Bedroom

My friend recruited me this past weekend to help her with her son’s bedroom walls. She just recently had the bedroom painted all one color. It looks like this:
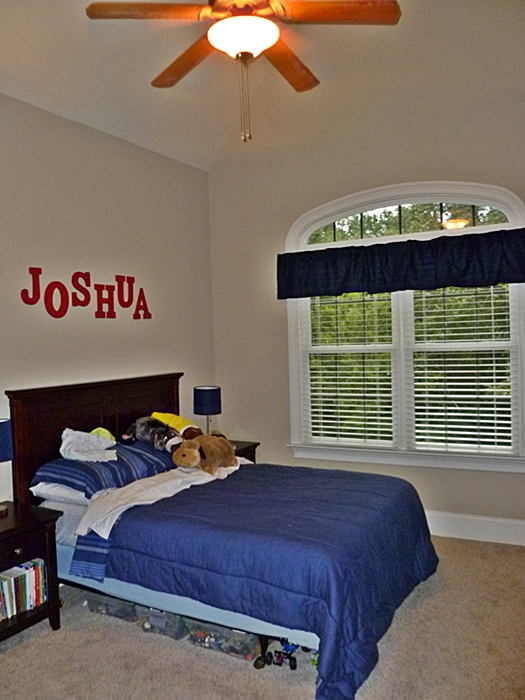
It is really a darling room with lots of great storage for her son's toys.


She wants to paint stripes around the whole room in a specific pattern. She does NOT want to paint stripes from the top of the room to the bottom. Here are her stripe options:


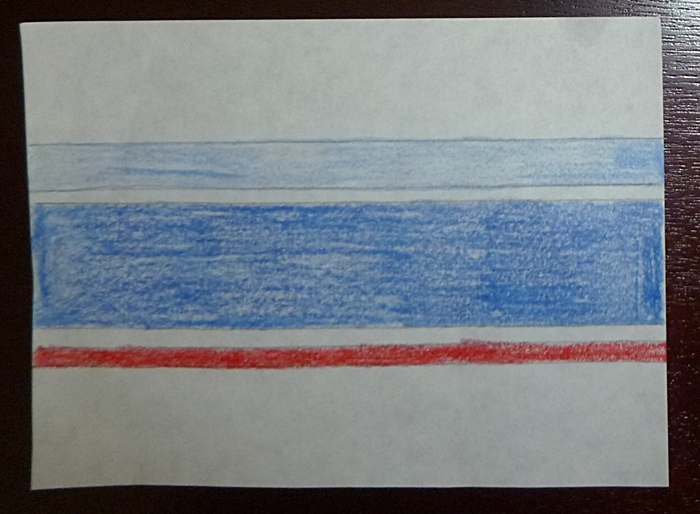


I told her that she couldn't go wrong with any of these! My favorite is….


I feel that too many size stripes would become too confusing in a space this size. You wouldn't get to enjoy all the other design elements in the room because the stripes would take away from that.

The color palette she chose:

Great choice of color for a ten-year-old boy! It can stay with him for a long while.


So....you are probably thinking: "What does she need help with, it looks great!??" Well...she wanted my opinion on what pattern was my favorite and where to exactly place the stripes. How far up?, How far down the wall they should go?, How wide should each stripe be?, etc.

Her son's room has very tall ceilings with a peak on either side of the room. It was a very tricky decision. You wouldn't want to put the stripes up too high because they would get lost in the atmosphere and wouldn't bring much of a design element to the space.  You also wouldn't want the stripes too low either. The furniture would end up hiding them.

My suggestion was to have the top edge of the top stripe match the molding at the top of the doors. (Yep those are a lot of "tops"!) This looked like the right height. As you enter the room, the stripes would pop out as an accent to the rest of the space. I also suggested that the height of the stripes combined together should be at least 2 feet. If they were any smaller, they would get eaten up in such a large space. The stripes would look more like a border than a grand statement. If you went farther down than 2 feet, that also would make an impact on the room, but you wouldn't want them so long that, yet again, they would get lost with the rest of the furniture in the room.


Here are a few examples I sent over to her to help with the decision making:


I can’t wait to see what she decides and what the room ends up looking like!
Thanks Staci for letting me share your son's awesome space! 


Tomorrow is FRIDAY! Anyone else ready??

Amy ©

Wednesday, September 14, 2011

Master Bedroom Makeover

As I have gotten older, my style has evolved and I have found designs and styles that take my breath away. I feel my style use to be more country.  I loved the feel of quilts and enjoyed the shaker style of wood furniture. I still think those styles are beautiful, but don’t quite fit into the decorating scheme of this home.

I now feel as though I have shifted my style to modern/traditional. I love the curved pieces of sleigh beds, but really crave a good geometric shaped pattern on a pillow, rug, throw or artwork. I like walking into a room and seeing many different styles and pieces thrown together to create one magnificent room!

Below is a picture of what my master bedroom looked like just a few months ago:

As you can see, I needed to do quite a few updates. I really love this pottery barn bedding, but I want something a little more light and airy feeling. Something a little more....relaxed. With that being said, I still might pull this bedding out for the holiday season and bring some warmth back into my room.

Everything in this room was dark: Dark bed, dark bedding, dark side tables, dark dresser and dark picture. I just needed a change!

I first wanted to pick a wall color that would calm the room as well as feel inviting as soon as you walked in. Well…let me just say, the color didn’t turn out the way I wanted. I wanted a true gray and what did I get? BLUE!

I decided on the color "Simply Gray" by Valspar Signature Colors. Wouldn't you think that if a color were called SIMPLY GRAY....it would be gray! Well...I guess the crazy NOT!


So this was how it all started…..after letting out a BIG scream sigh, I decided that if I kept everything in the room light, that it wouldn’t be so blue after all. (I really didn’t want to repaint!)


Then on to my design board....I used my favorite sight, Olioboard, to compile furniture and ideas. I really loved the blue, yellow and gray color palette.


Ahhhh....doesn't this room already make you feel relaxed?


So this is where I am in my master bedroom makerover...trying to finish up the projects on a tight budget without losing any of the great design elements.


Here is my Master Bedroom to do list:

  • Paint Walls & Tray Ceiling
  • Create Gallery Wall
  • Recover seat cushion on chair & add edging
  • New Grommet Drapes
  • New Bedside Lamps
  • New Bedding
  • Make Euro Pillows with dove fabric
  • Spray paint bedside tables white
  • Change out knobs on large dresser
  • New Artwork above bed
  • Change out Fan for light fixture (sorry…hubs said the fan must stay!)

Not so bad huh? I am getting there and can’t wait to share the great progress with all of you!

What do you think so far? How about the color?

Today is my last day in the 20’s! Wish me luck! HA!

Amy ©

Tuesday, September 13, 2011

Gallery Wall Progress

Hello! Hope everyone had a great weekend! It is already Tuesday and I need to get going with updating you on all of my great progress around this joint!

I few weeks back, I posted about different types of gallery walls. I really needed a change in my master bedroom. The wall opposite of my bed looked like this:


BORING! Right?..yeah you try waking up to that each morning! HA!

The floating shelves didn't even take up half of the wall space. They needed to GO! I had many of you vote for your favorite gallery wall on my previous post and here is the winner:


I really do like this gallery wall as well. I love how there is a mixture of black and white frames alternating with white or black mats. I also like that they mixed photographs and artwork on the same wall. It feels personal, which is what your home should feel like: A representation of you and your family!

So I decided to do the same thing in my bedroom, only I did add some color. I just LOVE color! I do like the calm feeling of just black and white, but I need a little punch of color now and again. Don't you?!

It took me a long time to decide what pictures and artwork to use. I have so many favorites, I didn't want to leave any out! After I decided on the pictures and art, I started laying my frames out on the floor to get a feel of where I should put each picture.


Once I arranged the pictures the way I wanted, I started to trace the outline of each frame using wrapping paper. (I know right?...that is all I had around the house and it was free!) I then cut out each piece of paper and started hanging them on the wall with blue painters tape.


The reason for this long step is to make sure you have the correct distance between the frames that appeal to you. I didn't want large gaps between my frames, but I also wanted to make sure that the frames took up a good part of that boring wall.

Once I had all the papers the way I wanted them, I started pounding some nails! Then the rest is history!

Check...


It....


Out....


I think it really turned out great! It is hard to tell in these pictures, but it does take up a big part of that boring wall. I also have plenty of room to expand my gallery wall as I find new pictures or artwork that MUST go into my master bedroom.


I even framed a couple pieces of fabric as artwork. This fabric is being used throughout the master bedroom as accent pillows or chair covers.


I found this little beauty in my parents attic! My dad drew this when he was in high school. I thought it was so neat to have an artwork piece from him in my room.


Of course I had to bring in the paint chip artwork that I made! I just love it!


Each frame has a different thickness to it. That brings another element of artistic nature to the gallery wall.
(Sorry about the vent in this picture..there was no way around it!)


Ok One Last Before and After!.....

BEFORE


AFTER


Quite the transformation...I think! It will continue to be a work in progress as I add more photographs and artwork over the years.

What do you think?!

Amy ©


Linked project with: Homestories AtoZ


Friday, September 9, 2011

Office Sneak Peek

Hello Fabulous Readers! I took a little break this past week from blogging. My house needed some attention and I don't mean decorating attention. It was d-i-r-t-y! Not like....you can pick up a few things and it looks great. I mean....a good scrubbing for days might finally do it justice!
I guess that is what happens when you try to run 2 businesses, teach 8 piano lessons, tutor elementary kids and leave town for Labor Day!
Well....I will be back in full action next week with lots of goodies for ya!

Thought I would give you a little Friday sneak peek into what we have been doing around the "New Downtown Office."

In this post, I talked about the layout of the office space. I also decided I was going to make the design Industrial with a twist!

Here is the mood board for the office:


We of course hit Ikea for some great finds, but couldn't fit everything in the truck. We just might have to make a second trip. I just know the Hubs will love that! HA!


Well.....drumroll....please!


An Office Sneak Peek!........


What do you think? I am totally excited and giddy! Can't wait for the finished product!

Have a Fabulous Weekend! What projects do you have planned?

Amy ©

Friday, September 2, 2011

Fab Friday

It is FINALLY FRIDAY! Can I get a....Wha What?

I am very excited that there is a long weekend ahead. I have always loved Labor Day. It means...time to unwind from the crazy Summer and move into a slower paced Fall. (we can only wish right?) I am sure getting excited for Fall! I can almost smell it in the air.....ummm pumkins, cider, leaves, soups and inside projects!

I always wondered why it was called Labor Day? Why not call it non-labor day? I mean we are suppose to take the day off...right? Well anyway....onto Fabulous Friday!

I am ending the summer Fab Friday with a Bang! Lots of fabulous "Bling" to look at this week. Enjoy!


 A little plaid never hurt no one!


        Fuschia Pillows-Retro Chic!                                        Fuschia Pump                  


        Love this green & white pillow!                                    Green open-toe wedge


             Funky Orange Zimba Pillow                                         Orange Flats


            Lipstick Red Parrot Pillow                                My FAB Favorite of the week!


A Long weekend = Lots of great projects to accomplish! Join me next week to see all my completed projects!

Hope you have a fantastic (non) Laboring weekend!

Amy ©

Thursday, September 1, 2011

Headboard Ideas

I received a comment the other day from a follower:

 “I have a special request for a project ... I need ideas for headboards. I have 2 guest bedrooms w/full-size beds but the rooms are not that big, so I don't want large beds that take up a lot of space. Got any ideas for creative, cheap, DIY headboard solutions?”

Boy oh Boy do I have some great ideas! There are so many creative headboards out there! Here are a few that I have found:

I love the classic diamond tuffted headboard.
I wouldn't mind trying to DIY one myself!


How about this gorgeous Fabric Panel Headboard? This would be so easy to make. I would guess they used 1 1/2 foot plywood. Then they cut foam or batting and glued it down to the board. Then they wrapped each square with fabric. So Fun!


Look at this creative beauty! You could go to your local hardware store and have them cut the size headboard that you need. Then you can use chalk board paint to add a fun decorative touch! So Neat! Why didn't I think of that?


This one is also pretty creative! Just add a decal to the wall in place of a headboard!


Sweet! Metal Roofing Headboard! Totally adds some glam to the space!


I really really LOVE this one! Reclaimed wood is so in!


These headboards are actually part of the wall! The wainscotting and ledge really give it a homey feel! Just beautful!


How about this DIY painted headboard?
This headboard adds so much color to this room!


This is definitely one of my Favorites! Framed Fabric Headboard! How easy is this? Find some fabulous fabric that goes with your room decor and frame it. You could take the pattern verticle, like the picture, or you could go horizontal if your room was larger!
LOVE!


Picket Fence Headboard...very Shabby Chic!


Last...but definitely not least! The door headboard. I know many DIYers that find old doors at flea markets and make them into beauties like these!


How about all of you? Have you done any DIY headboards that are blog worthy? I would love to see and hear about them!

Hope I gave all of you a little inspiration! I know I am inspired....I just might try one of these great projects myself. You never know.

I also found most of these awesome pics on pinterest. If you haven't joined this fabulous sight....you might not want to! HA! Why?....because it is so incredibly addicting..thats why!

Tomorrow is Fri-Tahy!

Amy ©


Related Posts Plugin for WordPress, Blogger...

Total Pageviews