Monday, October 31, 2011

Happy Halloween


I hope everyone has a fun and safe Halloween! I only wish we were having a festive Halloween party like this one:

source unknown

Last Halloween with one of my favorite friends:

No Parties this year....just hanging around the old homestead passing out tons of sugar healthy snacks to scary Trick or Treaters!

What are you doing for Halloween? Anyone dressing up?

Sunday, October 30, 2011

DIY Burlap Wreath Voted Top 10

Hello All! I usually don't post on Sundays, but was excited to tell you that my DIY Burlap Fall Wreath was featured on the CSI Project!


I was very honored to be in the top 10 out of hundreds of Fabulous Fall wreaths!

Visit thecsiproject.com
Thank you to all of my readers and followers for supporting me and reading all of my crazy posts each day! You are the reason that I write and create!

To check out The CSI Project's blog Click Here.
To see how I made my Burlap Wreath Click Here.

Wednesday, October 26, 2011

Olioboard Love

Good Morning Decorators! Hope your Wednesday is off to a great start! Today's post is going to be a bit short. Lots of work for me to do today.

How many of you are familiar with Olioboard? It is a FREE online design board where you can use all of your favorite furniture, pillows, wall decor, etc to make unbelievable moodboards for all of your decorating projects! OR you can just browse thousands of moodboards to get great ideas and inspiration. Well...it is just amazing and I have been having a lot of fun making and creating myself.

Here are just a couple that I have created. Some of you might have seen them in previous posts:


Make sure you check out Olioboard when you get a chance! You won't be disappointed. (You also won't get much done!HA!)

Tuesday, October 25, 2011

For the Love of....

Kelly Green


I have always been a huge fan of green and this color doesn't disappoint! Kelly Green is an amazing shade that feels very elegant and sophisticated when paired with black & white or gold with a little pop of fuchsia.


Look at those beautiful walls! via


Love the pop of green against black & white cheetah print. via


How about this outdoor space with the black & white striped walls? via


Ooh La La...amazing dressing room!


Even little pops of Kelly Green can give a space "BLING"!!


Pretty much love EVERYTHING about this room!


This white and stainless kitchen really lets the green bar stools shine!


These green chairs let the outdoors in!


Okay...are you still breathing? What do you think about Kelly Green? Would you want to add a little into your home? I am still figuring out how I can go about adding this color into a room. I need more rooms in my home!

Monday, October 24, 2011

Weekend DIY- Upholstered Victorian Chair

This past summer I was given this Victorian Chair from my parents:


I remember this chair use to be in my grandmothers home. She was a girly girl and loved pink. Yes...I am a girly girl also, but don't quite care for this faded salmon pink color.


I do however, love the carved details of this victorian beauty.

I decided I was going to tackle recovering this chair on my own. I found this light gray fabric from JoAnns. It was 50% off...so I couldn't resist.

I also thought it went well with the Euro Shams already made out of this dove fabric.


There were so many staples and nails in the chair that I decided to just cover over the pink fabric without trying to take it off. It would have taken me days if I had. I used a hammer to loosen up some staples and took them out so I would have room for the new ones.
{Sorry I don't have pics of the first couple of steps. I lost my blog brain that day.}

I then cut a large enough piece of fabric to cover the chair cushion plus 4 inches. I started stapling the front of the cushion. I had to keep pulling the fabric tight so it wouldn't pucker.

Once I had the whole seat covered and stapled, I trimmed up the sides with a pair of sewing scissors.

It then looked like this:
The seat turned out nice and tight, but the staples were pretty uneven. NO PROBLEM! I knew I was going to be covering them up with some sort of trim. I read many tutorials on how to sew double piping trim. It didn't seem that easy. So...when my mother-in law came to town this weekend, I asked for her help! She is the Sewer of all Sewers!

We decided it would take us all weekend just to do the piping, so we had a new plan of NO SEWING! HA!


We cut an inch and a half wide strip with the same fabric.


Then we tucked both sides over and gave it a good steam with the iron.


The Last step was the most FUN! We hot glued the trim to the chair and covered those ugly staples.


And the Finished Product.......

LOVE IT!


 We didn't even use a sewing machine! Not too bad for amateurs!


Before:                                                                       After:

I am looking forward to adding this little beauty to the Master Bedroom.

Thanks Mom H. for your help! It was a fun project!

Linked up at:
Home Stories A2Z

Sunday, October 23, 2011

Orange You Glad....

I recently ordered Happy Chic Colors by Jonathan Adler.  If you know anything about Jonathan Adler....you know how quirky and eclectic he really is! I smile each time I see his style. It is so bright, fun and completely different!


While reading through his book this weekend, I stopped at the section on the color ORANGE. He talked about how Orange = electrolytes for your eyeballs! Hilarious and so true!

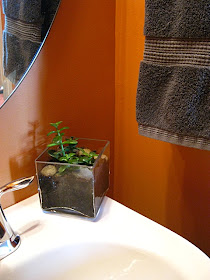
This past year I actually painted our half bath orange. I wanted a little punch of something downstairs, since the rest of the rooms are pretty neutral.
I think that Orange says I am a fun person and I am not afraid of color! I know that orange is not for everyone, but I just smile each time I walk into that bathroom. It really does put you in a better mood! HA!

The color that we used was:
Butterscotch by: Martha Stewart
This sample definitely doesn't do it justice!

The picture below is exactly how it turns out on the walls! This is the true butterscotch!
via

Here are some pics of our half bathroom. I paired this specific orange color with gray. I really like how it turned out.


Little Bathroom caddy holds succulents and supplies. There is literally NO storage in this small space.


I love these abstract prints that I inherited from a good friend!


Adding a little gray makes the space feel a little more sophisticated!


What do you think? What colors have you tried that really make a punch?

Friday, October 21, 2011

It's Beginning to Look a lot Like........

Christmas.....Fall! (sorry I got carried away with the wrong season)

Don't you just love the colors that Fall can bring? We sure have been enjoying some leaves on our lawn, cooler weather, cider and warm blankets! It was in the 80's here on Monday & Tuesday so I couldn't really write this post until today because it will finally be in the 60's! (Yes! Sweater Weather!)

This weather also puts me in the mood to decorate for a different season. I must admit that my husband enjoys getting the fall decorations out more than I do! However, I have enjoyed creating some fall diy's around here this year!

Here are a few pics of what has been going on around here!
Made another banner for the dinning room. You can see my Halloween Banner here.

A Little Vignette on the sofa table. I made these little tea lights with some
burlap and filled my glass table lamp with some fall leaves.

Some funky gourds accent the wine rack with a little color.


Pumpkin Centerpiece on the dining room table. I found this old wooden box at a flea market this summer for $10! It fits our table perfectly.


Love me some dovetailing details!


A little outside decor.

Found me some beautiful cinderella pumpkins!

This burlap wreath really brings some "bling" to the front door!


I am really enjoying the cooler weather and I'm even more excited for the holiday season around the corner!

What have you been doing to enjoy the Fall?